When you capture a UserForm from its LegacyWorkbook, the UCF creates a FormSpec worksheet for it in the Capture Workbook. If the UCF finds any back-end code in the UserForm, it copies that code into the FormSpec worksheet. This section describes the relevant commands and settings that affect how MDUF uses that code when it generates UserForms.
- Introduction to code-wrangling
- Generating UserForms from captured data
- Migrating back-end code and testing
Introduction to code-wrangling
When you capture a UserForm from its LegacyWorkbook, the UCF creates a FormSpec worksheet for it in the Capture Workbook. If the UCF finds any back-end code in the UserForm, it copies that code into the FormSpec worksheet in the UserForm Code Block, which is located below the Control Properties Block of the FormSpec worksheet. When you generate the captured UserForm, the forms-generation process can use this code in various ways, depending upon the command you invoked and the values of certain settings. This section describes the relevant commands and settings that affect how MDUF generates UserForms.
Let’s begin with an introduction to the development process for capturing legacy UserForms. The overall goal is to replace the legacy UserForm with a UserForm generated by MDUF from a FormSpec worksheet.
Generating UserForms from captured data
There are three ways to generate UserForms from the data captured by the UCF. These three methods are distinguished by the choice you make as to what MDUF uses as the source for the back-end code of the newly generated UserForm. To specify the source, you select from a drop down menu in the cell named CodeSource on the FormSpec worksheet.
CodeSource setting: This Worksheet
This setting directs MDUF to use the code contained in the UserForm Code Block of the FormSpec worksheet when generating the UserForm. This choice, “This Worksheet”, is the most common for early stages of generating captured UserForms. In later stages, you’ll likely have made some changes to the form’s code. At that point, you can either migrate the code back from the previously generated UserForm (CodeSource setting “Target UserForm”), or use the code that’s stored on the FormSpec worksheet (CodeSource setting “This Worksheet”). If you’ve made some recent changes, you’d likely choose “Target UserForm”), or use “This Worksheet” if you haven’t.
CodeSource setting: Target UserForm
With this setting for CodeSource, MDUF ignores the code it finds in the Event Code block, and all the code it finds in the UserForm Code block. When MDUF generates the UserForm, it uses only the code it finds in the target UserForm.

CodeSource setting: Code Generator
With this setting, MDUF generates code for the controls it finds on the FormSpec worksheet, and appends to that the code it finds in the Event Code block of the FormSpec worksheet. This is useful only in the very earliest stages of UserForm generation. Obviously, MDUF cannot write handlers to capture and process whatever data it finds in the controls of the UserForm. But the generated code can reduce the amount of “pedestrian” coding necessary to make a functioning UserForm.
How to set code sources for UserForms
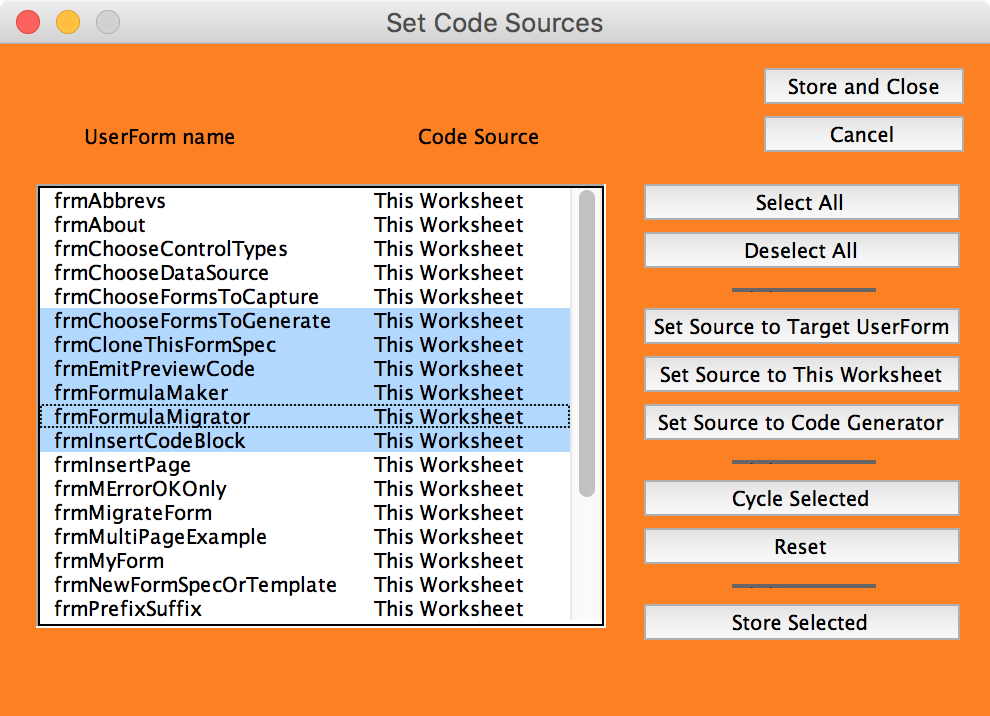
You can set the code sources for an entire project using the MDUF ribbon command This Project>Generate>Set Code Sources…. MDUF then displays the Set Code Sources UserForm. It contains a ListBox that shows, for each UserForm in the active project, the name and current code source of that UserForm. To the right are a number of controls, which function as follows:
Select All
Selects all items in the ListBox
Deselect All
Deselects all items in the ListBox
Set Source to Target UserForm
Sets the code source of all selected items to Target UserForm
Set Source to This Worksheet
Sets the code source of all selected items to This Worksheet
Set Source to Code Generator
Sets the code source of all selected items to Code Generator
Cycle Selected
For each selected item, cycles to the next source in the cycle Target UserForm, This Worksheet, Code Generator (wraps around)
Reset
Resets the contents of the ListBox according to the current state of the project. Use this command when you’re unsure what you have stored already and you want to start from the latest stored values.
Store Selected
For the selected items, stores their data in the corresponding FormSpec worksheets. Note: the changes you made aren’t saved until you save the Project workbook.
Store and Close
This command is identical to “Store Selected”, but it also exits the UserForm, hides it, and returns control to Excel.
Cancel
Exits the UserForm, hides it, and returns control to Excel.
Ribbon command: This FormSpec>This Form>Generate
This command directs MDUF to generate the UserForm for each of its targets. In doing so, it considers the setting “CodeSource”. You can generate the UserForms of an entire project with the ribbon command MDUF>This Project>Generation>Generate This Project.
Ribbon command: This FormSpec>This Form>Preview…
If the target workbook contains this UserForm, MDUF shows you the form. See the section, “Conducting tests of generated UserForms“ for details.
Migrating back-end code and testing
After capturing a UserForm, a copy of the legacy code it contained (the “code-behind” or “back-end code”) is stored in the UserForm Code block of the FormSpec worksheet of the ProjectWorkbook. The back-end code is also still in the code pane of the UserForm in the LegacyWorkbook. To add or change controls in the UserForm, you can make changes to the MDUF representation of the UserForm, and then regenerate the form.
But there’s a problem. Until the back-end code of the legacy UserForm is in the format of the MDUF code framework, regenerating the UserForm causes MDUF to overwrite the back-end code. Not good. If you make a change to the UserForm’s back-end code, and then regenerate the UserForm, you’ll lose that change, because MDUF discards the existing UserForm from Excel and replaces it with the newly generated one.
One solution is to keep the back-end code in the FormSpec worksheet. Make changes there. And then insert that copy into the generated UserForm’s code pane. That does work. And that’s exactly what the setting CodeSource Setting: This Worksheet does. With this setting, the MDUF UserForm generator inserts the content of the UserForm Code Block into the code pane of the UserForm it generates.
But this approach is a bit inconvenient. Because you’re making code changes in the FormSpec worksheet, and not in the code pane, you don’t have access to the tools of the Visual Basic Editor. You can’t compile, for example. You’re just editing text. If the code won’t compile, you don’t learn of the problem until you migrate the text into the code pane, either by regenerating the UserForm, or by copy-and-paste.
So a slightly better approach is to do your editing in the code pane of the UserForm, and copy that back into the UserForm Code Block of the FormSpec worksheet. That’s much better, because you have access to the tools of the Visual Basic Editor. MDUF supports that style of working. There is an option in the capture mDialogBox that directs MDUF to capture only the back-end code of a UserForm, and not the properties, sizes, or locations of controls. Using this option, you can do all your code development in the VBA editor, and periodically capture the code into the FormSpec worksheet.

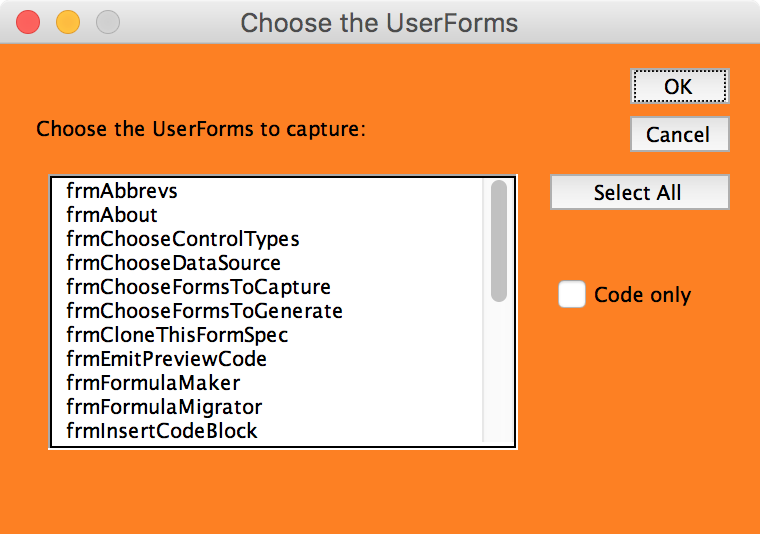
To perform this operation, use the MDUF ribbon command This Project>Capture…. This command invokes the mDialogBox titled “Choose the UserForms”, which lets you select which UserForms you want to capture. By checking the “Code only” CheckBox, you direct MDUF to capture only the back-end code.
This code capture approach is intended mainly for use in two cases. The first is maintaining UserForms that haven’t yet been fully transformed into MDUF representation. It lets you make minor changes and fixes even though you still plan to convert the UserForm to MDUF representation. The second is ongoing development of the UserForm when the changes underway involve changes to back-end code.
There is a risk. You might forget to transfer the edited legacy code from the code pane of the UserForm to the Code Block of the FormSpec worksheet. MDUF provides a little protection for that case. At UserForm generation time, for UserForms not yet fully converted to MDUF representation, MDUF checks to ensure that the contents of the code pane match the contents of the UserForm Code Block of the FormSpec worksheet. If they aren’t identical, MDUF announces the mismatch and asks you whether you want to (a) continue with UserForm generation, using the MDUF copy of the legacy code; or (b) continue with UserForm generation, using the UserForm copy of the legacy code, overwriting the MDUF copy; or (c) cancel.
Completing the transformation from the legacy representation of the UserForm to the MDUF representation requires that the legacy code be recast into the MDUF code framework. Once that change is complete, you can freely edit the code in the code pane of the UserForm in Excel. Regenerating the UserForm from MDUF representation into Excel won’t overwrite the back-end code, because MDUF knows how to preserve code that is in the format of the MDUF code framework.
Revising the captured UserForm to make use of MDUF capabilities
After creating the MDUF representation of a UserForm, you can easily inspect the results. That inspection might reveal inconsistencies and peculiarities. For example, you might notice an extra space character here and there, or a typo, or misaligned controls, or other minor details.
Some of these corrections can be performed on the MDUF representation using a script. If you need to re-capture the UserForm in the future, you can just run the script again and no work will be lost. But if the corrections are of a kind that can’t be performed by scripting, and if you perform them manually, the corrections might be overwritten if the legacy UserForm is ever re-captured in MDUF.
Instead of manually correcting the MDUF representation, it’s better to correct the legacy UserForm in a version of Excel that offers a GUFEF. This approach has the added advantage that when comparing the MDUF-generated UserForm to the original GUFEF-made UserForm, the differences won’t include corrections you made in MDUF.
This Project>Generate>Set Targets…

This command provides convenience for setting the targets for the UserForms of a project. It’s especially useful when capturing the legacy UserForms of a project.
The command enables you to specify the target workbook for generating UserForms from an MDUF Project workbook. You can specify a target for some UserForms, or for all UserForms in the Project. In either case, the target workbook must exist before you invoke this command.
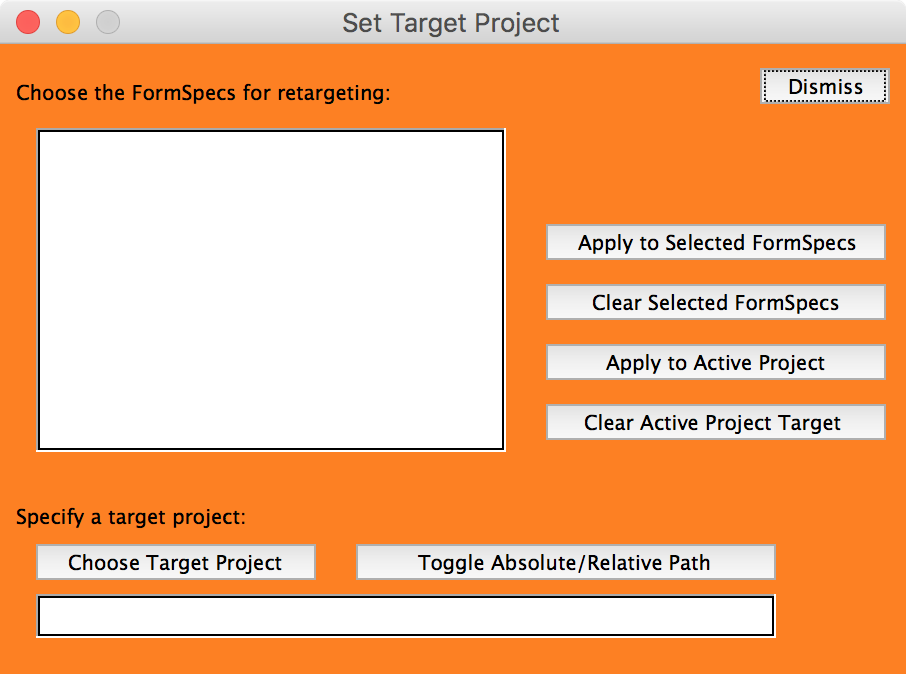
When you invoke this command, MDUF presents an mDialogBox titled “Set Target Project”. It contains a ListBox that holds the names of all UserForms in MDUF representation in the active project. That is, if a worksheet representation of a UserForm exists in the active project, that worksheet’s name appears in the Set Target Project mDialogBox.
In a typical use, you can select the names of the UserForms of interest. You would then use the “Choose Target Project” command button to select the file that holds the target project. When you’ve navigated to the file, selected it, and clicked OK, MDUF enters the full pathname of that file into the textbox at the bottom of the Set Target Project mDialogBox.
In the most common case, the TargetWorkbook file is “near” the ProjectWorkbook file. In that case, the pathname of the target project relative to the active project is relatively simple. You can direct MDUF to use the relative pathname by clicking the command button captioned “Toggle Absolute/Relative Path”. This command button toggles the path of the TargetWorkbook file between the absolute path and the path relative to the active workbook.
After you’ve specified the target project path, you can apply it to the FormSpec worksheets that you selected in the ListBox. The command button “Apply to selected FormSpecs” carries out that task. To apply it to the entire active project, use the command button “Apply to Active Project.”
To clear the project specifications of the selected FormSpecs, use the command button “Clear Selected FormSpecs” To clear the target project specification from the active project, use the command button “Clear Active Project Target”.
For convenience, the Set Targets mDialogBox also contains a button named “Select All”. If you click this button, MDUF selects all items in the ListBox.