In Designer, you insert controls graphically, and move them around on the form using the mouse. In MDUF, you enter data representing controls and their positioning into the cells of a worksheet.
- The Project workbook and its FormSpec worksheets
- Generating UserForms from FormSpec worksheets
- The “Form record”
- How MDUF lays out UserForms
- Restrictions on some entries
- Customizing display of the FormSpec worksheet
- Compatibility issues for Microsoft 365
- Checking for errors
- The #NAME? error
- Recalculation
The Project workbook and its FormSpec worksheets
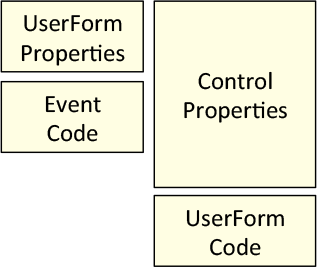
MDUF UserForms are defined by entering data into a FormSpec worksheet in a Project workbook. Each FormSpec worksheet defines one UserForm. The FormSpec worksheet is divided into four major blocks, shown here.

UserForm Properties Block
At the upper left of the FormSpec worksheet is a section of cells that define some properties of the UserForm as a whole, such as its colors. This section of the FormSpec worksheet is labeled “Form properties”. For detailed information, see “Basic UserForm Properties”.
Event Code Block
Below the UserForm Properties Block of the FormSpec worksheet is a section titled “Event code”. It holds code frameworks for the two most common command buttons on Excel UserForms, “OK” and “Cancel”. You can edit these frameworks, or add new frameworks, as described in the section, “Code for Event Handlers”.
Control Properties Block
The main part of the FormSpec worksheet, to the right of the UserForm Properties Block, is the Control Properties Block. It’s divided into 15 sections. The bottom section is for specifying properties of the UserForm itself, such as name, size, and colors. See the section “Form record”. The other 14 sections are for each type of control that can appear on a UserForm. Examples are ListBoxes, Labels, CheckBoxes, CommandButtons, and so on.
Below the Control Properties Block on the FormSpec worksheet is the UserForm Code Block. This section holds UserForm code, if you choose to enter it there. Usually, you won’t. Usually, you’ll enter your UserForm code in the code pane of the UserForm. However, when you capture legacy UserForms to convert them to MDUF representation, MDUF inserts the captured UserForm code in this block for later retrieval. More about this in “Overview of Capturing Legacy UserForms”.
In this User Guide, the code in the code pane of a UserForm is often referred to as the code-behind.
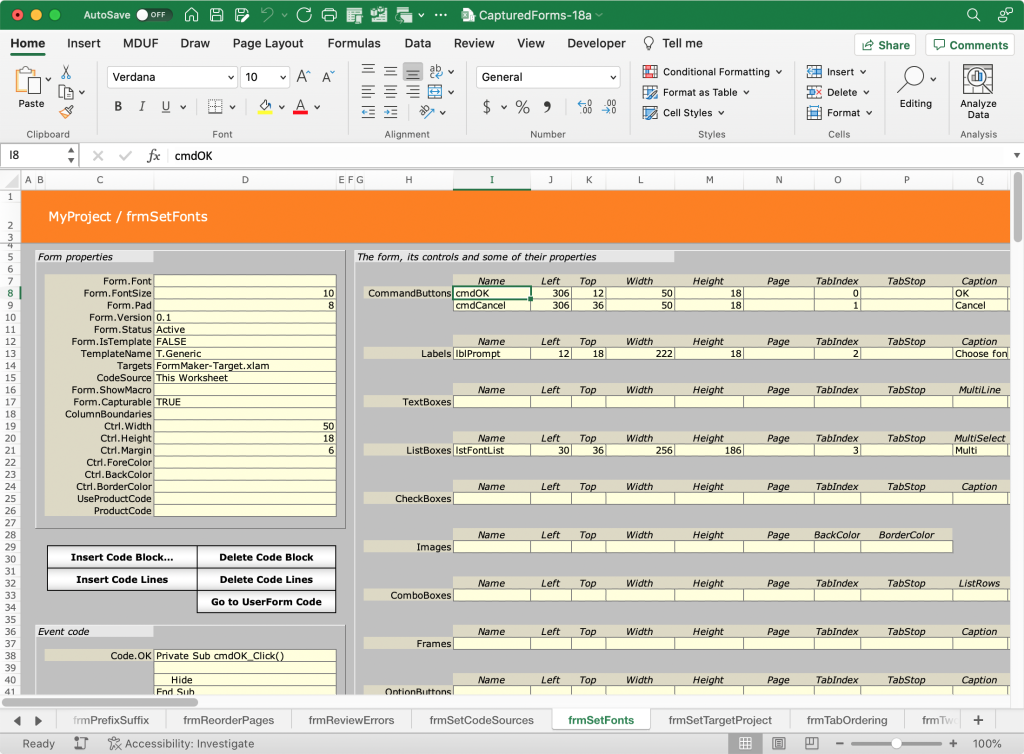
Below is a screenshot of part of a FormSpec worksheet.

A Project workbook can contain an arbitrary number of FormSpec worksheets, limited only by Excel’s constraints. But typical MDUF Project workbooks contain only the FormSpec worksheets for UserForms that are related to each other by belonging to the same project. For example, if you were supporting a set of workbooks being used for estimating a construction contract, all FormSpec worksheets for those workbooks would reside in the same Project workbook. Grouping them this way makes it easier to achieve a consistent look and feel for these related UserForms, and MDUF provides some tools for minimizing the effort required.
Generating UserForms from FormSpec worksheets
After you enter data for a UserForm and its controls, you can invoke MDUF commands from the Ribbon to generate the UserForm you’ve specified. Below are three examples of these commands.
This FormSpec>This Form>Generate
This command generates a UserForm as specified on the active worksheet. The UserForm is inserted into the workbook (or workbooks) specified by EffectiveTarget. If the target workbook isn’t already loaded into Excel, Excel loads the workbook. See the description of Targets in the section “Specifying target workbooks”. In generating UserForms, MDUF considers the setting of the option CodeSource for each FormSpec sheet.
This Project>Generation>Generate Forms…
This command presents the mDialogBox titled “Choose Forms to Generate”. It contains a ListBox that has the names of all FormSpec worksheets currently active in the active project. To select all items, click the button captioned “Select All”. The ListBox also contains an item titled “All”. Select “All” or select only the names of the UserForms you want to generate and click “OK”. MDUF then generates the UserForms you selected. Each UserForm is inserted into the workbook (or workbooks) specified by EffectiveTarget. In generating UserForms, MDUF considers the setting of the option CodeSource for each FormSpec sheet.
This Project>Generation>Generate This Project
This command generates all UserForms defined in the Project workbook. Each UserForm is inserted into the workbook (or workbooks) specified by EffectiveTarget. In generating UserForms, MDUF considers the setting of the option CodeSource for each FormSpec sheet. With respect to UserForm generation, this command is equivalent to activating the FormSpec worksheets of the project workbook one by one, and invoking the command “Generate Form” on each one.
The “Form record”
The Form record is a single row of cells on the FormSpec worksheet. In MDUF, each cell in a record is labeled by the cell above the group of records for that control type: Name, Left, Top, and so on. There is one and only one Form record on the FormSpec worksheet. You cannot delete the Form record, and you cannot create new Form records. Below is a description of the meanings of the cells of a Form record.
Name
The Form record cell labeled “Name” holds the name of the UserForm. The name of the UserForm isn’t visible to end users of the UserForm. It’s the name used in your code to refer to the UserForm. The name of a UserForm, and the names of all controls, must begin with a letter. It can contain only letters, numbers, and underscores (no spaces). It cannot be a reserved word. And it can be up to 40 characters long. Names must be unique in their context. For example, two UserForms in the same workbook cannot have the same name.
Left
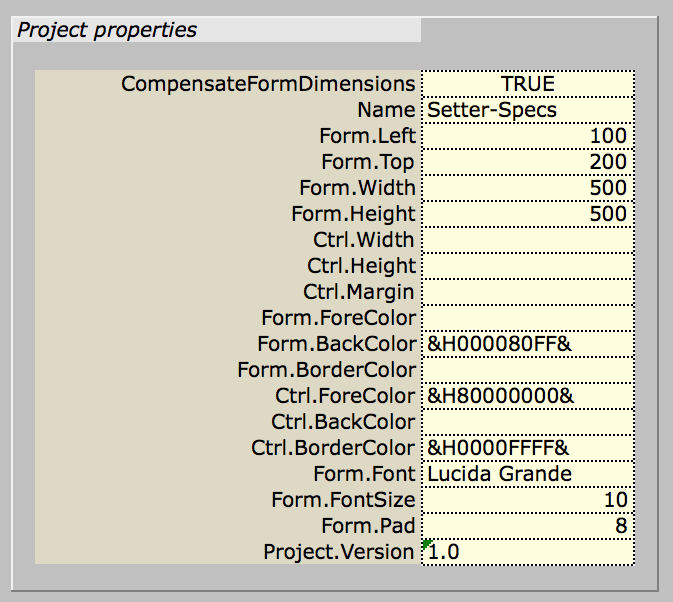
The Form record cell labeled “Left” sets the horizontal coordinate of the left edge of the UserForm when your user first displays it. If you leave this cell empty, MDUF uses the contents of the cell Project!Form.Left. In this way, every UserForm in your project can “inherit” the project’s setting for initial horizontal coordinate.
Top
The Form record cell labeled “Top” sets the vertical coordinate of the top edge of the UserForm when your user first displays it. If you leave this cell empty, MDUF uses the contents of the cell Project!Form.Top found on the Project worksheet. In this way, every UserForm in your project can “inherit” the project’s setting for initial vertical coordinate.

Width
The Form record cell labeled “Width” sets the width of the UserForm when your user displays it. If this cell is blank, MDUF uses the contents of the cell Project!Form.Width. MDUF is distributed with a value of 500 for every Project’s Form.Width, but you can change it. Width must be nonzero before you can use the MDUF worksheet function FlushRight to position a control without generating errors. See “Specifying Control Positions”.
Height
The Form record cell labeled “Height” sets the height of the UserForm when your user displays it. If this cell is blank, MDUF uses the contents of the cell Form.Height on the Project worksheet. MDUF is distributed with a value of 500 for every Project’s Form.Height, but you can change it. Height must be nonzero before you can use the MDUF worksheet function FlushBottom to position a control without generating errors. See “Specifying Control Positions”.
Caption
The cell labeled “Caption” is the caption that appears in the title bar of the UserForm. This cell, like all cells in the Form record, can contain a formula.
ForeColor, BackColor, BorderColor
These cells of the Form record control the respective colors of the UserForm, but not its controls. If any of these cells are blank, MDUF uses the contents of the cells on the Project worksheet labeled Form.ForeColor, Form.BackColor, and Form.BorderColor, respectively. This makes for convenient specification of the color scheme for the UserForms of an entire project.
Set these colors by selecting a cell, then invoking the MDUF Ribbon command This FormSpec>Set/Clear Color>Set Selected Cells… Use this command as well to set the colors Project!Form.ForeColor, Project!Form.BackColor, and Project!Form.BorderColor.
How MDUF lays out UserForms
Like Excel UserForms generated by means of Excel’s graphical UserForm editor facility (GUFEF), every FormSpec in MDUF is assumed to generate a UserForm that presents itself as a rectangle. UserForms generated by MDUF have an inner pad inside the rectangle. The inner pad is set to 8 twips (1 twin = 1/1440 inch), but you can adjust this if you wish, either on a form-by-form basis, or for an entire project.
Controls emitted by MDUF are assumed to have a margin of 6 twips, and that margin is also adjustable on a form-by-form basis. Adjacent controls share margins. That is, the minimum spacing between controls is 6 twips (not 12 twips, which would be the result if controls didn’t share margins). Controls also share margin with the UserForm’s inner pad. Thus, a control can be as close as 8 twips to the edge of the UserForm (adjustable on a form-by-form basis).
You can specify the size of a control by entering numbers (or formulas that evaluate to numbers) in the Width and Height cells of the control’s record. You can specify the position of a control by entering numbers (or formulas that evaluate to numbers) in the Left and Top cells of the control’s record.
For details, see “Specifying Control Positions”.
Restrictions on some entries
Some of the properties for some controls can take on only a restricted set of values. For example, the width of a control must be between 0 and 20000 twips. A second example: The control record cell labeled “Name” holds the name of the control. The name of the control isn’t visible to end users of the UserForm. It’s the name used in your code to refer to the UserForm.
VBA restricts the names of controls and the names of all UserForms. A name must begin with a letter. It can contain only letters, numbers, and underscores (no spaces). It cannot be a VBA reserved word. And it can be up to 40 characters long. Names must be unique in their context. For example, two controls on the same UserForm cannot have the same name.
These restrictions limit the possibility of mysterious errors in the macros that generate the UserForms. If the restrictions prevent you from doing what you need to do, contact MDUF support.
Customizing display of the FormSpec worksheet
When you’re working on the placement or size of controls, or when you’re editing any of the other control properties that are accessible on the FormSpec worksheet, you don’t usually need much access to the “UserForm properties” section of the FormSpec worksheet. MDUF provides a convenience for freezing the window such that the UserForm properties aren’t visible, and most of the window is available for displaying control properties.
There are three ribbon commands that support this capability. They’re all located in the MDUF group on the View tab of the Excel ribbon.
This command freezes the active window such that the control name column and control type column are always visible. The active sheet must be an MDUF FormSpec worksheet.
This command freezes the active window in the standard configuration with all portions of the FormSpec worksheet visible. The active sheet must be an MDUF FormSpec worksheet.
This command unfreezes the active window, with a single pane. The active sheet must be an MDUF FormSpec worksheet.
A common property of most well-designed UserForms is that they use only a few kinds of controls. Because your UserForm likely uses only a few kinds of controls, and because there are 14 control types altogether, and because the FormSpec worksheet displays all 14 of them, much of the screen is consumed by portions of the FormSpec worksheet that contain no relevant information. That’s why MDUF offers ribbon commands for hiding and unhiding irrelevant portions of the FormSpec worksheet.
View>MDUF>Hide>This FormSpec’s Empty Record Blocks
Typically, you’ll have some idea that a few control types won’t be needed for a UserForm, or perhaps they won’t be needed yet. So the spaces in the FormSpec worksheet for those kinds of controls are empty. You can hide all empty record blocks with this command.
View>MDUF>Hide>This Project’s Empty Record Blocks
This command is like Hide>This FormSpec’s Empty Record Blocks, but it operates on all FormSpec worksheets in the Project workbook.
Invoke this command to display an mDialogBox that lets you specify which control types you want to hide. MDUF then hides the record blocks of those control types on the active sheet, whether or not they’re empty. Use this command to push out of view the record blocks of control types that aren’t immediately relevant to what you’re working on.
View>MDUF>Unhide>All in This Project
Invoke this command to unhide, for each control type, all record blocks on all FormSpec worksheets in the Project.
View>MDUF>Unhide>All in This FormSpec
Invoke this command to unhide, for each control type, the record blocks on the active worksheet, which must be a FormSpec worksheet.
Invoke this command to display an mDialogBox that lets you specify which control types you want to unhide. MDUF then unhides the record blocks of those control types on the active sheet. Use this command to bring back into view the record blocks of control types that you previously hid, but which are now relevant to what you’re working on.
Compatibility issues for Microsoft 365
Because MDUF is intended to assist with migrating earlier work into Microsoft 365 for Mac, many users might encounter the sudden appearance of at signs (@) in cells that contain invocations of user-defined functions, intersection operators, or other forms. They do no harm. To help users understand why they occur, Microsoft has published a clear explanation. Essentially, when importing a file from an earlier version of Excel, Microsoft 365 inserts at signs in formulas when it believes they clarify things.
If you’re sure that such at signs are unnecessary, you can remove most of them. Use the MDUF ribbon command MDUF>Replace @>This FormSpec to remove the clarifying at signs on the active FormSpec worksheet. Use MDUF>Replace @>This Project to remove them from the active project workbook. At signs can’t be removed from formulas when they’re associated with using the intersection operator.
Checking for errors

The MDUF ribbon command This Workbook>Error Checking examines every cell in the used range of every worksheet of the active workbook. If it finds an error, it reports to you and gives you the option of examining the error or continuing with its survey until finished.
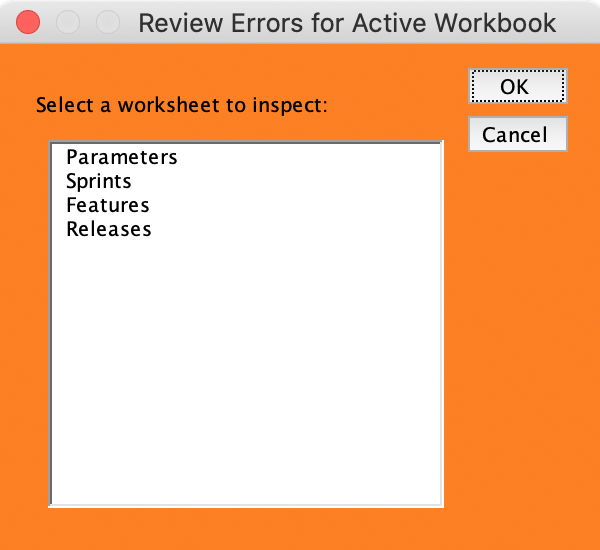
After the error checker examines a workbook, you can use the ribbon command This Workbook>Review Errors… to visit each worksheet that has errors. The command displays the UserForm captioned “Review Errors for Active Workbook,” which contains a list box. The list box contains a list of the names of all worksheets that contain errors. Select a sheet and click OK to activate that sheet with all error cells selected. Repeatedly pressing Return makes each error cell, in turn, the active cell.
These two ribbon commands are useful for any workbook, not just MDUF project workbooks.
The #NAME? error
If you see the #NAME? error in the cells of an MDUF Project workbook, there can be many causes. Perhaps the most common is mistyping the name of a worksheet function or the name of a range. But there is one particular cause related to the structure of MDUF FormSpec worksheets. And MDUF includes a command for clearing this error.
An MDUF-specific cause of the #NAME? error.
If you load an MDUF Project workbook into Excel but you haven’t first enabled the Formmaker add-in, and then recalculate one or more FormSpec worksheets that employ MDUF worksheet functions, #NAME? errors could appear. This happens when Excel can’t find the MDUF worksheet functions, since the add-in isn’t enabled.
How to clear these errors
As noted above, though, the #NAME? error can appear for many reasons unrelated to MDUF. If it does appear, and recalculating the workbook doesn’t clear the error, there is a procedure that can help.
First, ensure that the Formmaker add-in is installed and enabled. Next, optionally, reload the MDUF Project workbook that has the errors. Finally, invoke the MDUF ribbon command This Project>Repair Errors.
Recalculation
Many users typically work with Excel’s recalculation engine paused, a state that Excel calls manual recalculation. In this state, if you want to see the effect of recent changes, you must command the calculation engine to wake up and do some work.
There are two ways of doing this. First, you can recalculate all sheets of all loaded workbooks, invoked by pressing Command+= (F9 is usually used for recalc in Windows, but has other uses on the Mac) or by Excel’s ribbon command Formulas>Calculation>Calculate Now. Alternatively, you can recalculate the active sheet, invoked by pressing Shift+F9 or Command+Shift+=, or by Excel’s ribbon command Formulas>Calculation>Calculate.
MDUF provides a third option that recalculates just the cells in the selected range (if a range is selected). This command saves time when the sheet in question contains many user-defined functions, as FormSpec worksheets tend to do. You can invoke this by pressing Ctrl+Shift+C, or by the MDUF ribbon command This.